

 Danish


Leak repair part 3 - Repairing a hydraulic tube or a nut

In our first blog post in the series: Troubleshooting and repairing leaks, we gave an overview of how to troubleshoot hydraulic systems that leak and the areas you can focus on in connection with troubleshooting and repair.
Now that we have found the leaks and narrowed down the likely causes, what should we do to repair it? In this blog post, we take a closer look at what a leak from a tube or a nut means and what can be done about it.
When it comes to leaks, you should not make any assumptions. It is worth the time to consider all causes before rushing to get the leak fixed. Often only the symptoms are visible, and if a repair is carried out on that basis alone, you may miss the real cause, which can lead to more costly leaks and repairs in the future.
In our first blog post we outlined the following possible causes of a leak from a hydraulic tube or a nut:
- Incorrect tightening torque
- Incorrect alignment between tube and sealing surface
- Missing or damaged O-ring
- Incorrect brazing on the sealing surface
- Extruded O-ring
- Damaged fitting
At this point you have narrowed the leak down to the area around the nut in your connection. So how do you determine which of the above problems could be the root cause of the leak?
You will need to examine all the possible causes, because in some cases there will be more than one problem. To get the most accurate picture of the cause of the leak, it can help to disassemble the connection where the leak is located. As always, it is important that you take precautions and use proper safety measures. Make sure you have shut down and locked out the system before you begin.
This blog post deals specifically with leaks from a hydraulic tube or a nut on O-lok (ORFS) and JIC 37 degree Triple-lok fittings.
If you think the leak is coming from a nut/cutting ring on an adjustable port end, you can read or re-read our earlier blog post ”part 2 repairing a port end” via the link below.
Read more about ORFS fittings here! Read our blog post part 2 here!
Misalignment or incorrect fit
A critical step in the assembly process is aligning the tube with the fitting. If the tube and the sealing surface of the fitting are not aligned correctly before tightening the nut, a leak will occur. The correct procedure is always to align the tube and the sealing surface of the fitting properly before tightening the nut. Look at your connection. If the tube looks like it does on the left in picture 1, then the tube and the fitting are misaligned. If it looks like the right side of picture 1, then it is aligned correctly.
Picture 1

With a tube that is not aligned correctly, instead of forcing the gap closed by pressing the tube down so it fits, you should bend the tube properly so that it lines up with the fitting. If the tube does not span the distance because of an incorrect length or a bend in the wrong place, you should not try to force it together to make it fit either. In most cases, you will have to remove the tube and make a new one so that it can reach the connection.
If there is a gap between the fitting and the tube due to misalignment, a leak can occur because the sealing surfaces do not meet correctly. Do not use the nut to close the missing distance. By using the nut to close the gap, you are merely hiding the problem, not removing it. If the tube and the fitting are not aligned correctly, you will do more harm than good by continuing the assembly without having corrected the problem properly.
When the tube is not aligned correctly, it can affect two things:
- The tightening torque
- The quality of your connection
If you use the nut to make up for the gap between tube and fitting, you put stress on your connection. If the connection is not aligned correctly before tightening the nut, most of the torque will be used to achieve alignment of tube and fitting, and there may not be enough clamping load, which is necessary to assemble the connection correctly.
When the tube is correctly aligned, the nut will be able to be screwed all the way on by hand until it finally has to be tightened with a spanner.
We strongly recommend not using a nut to pull a misaligned connection together! It will place too great a load on the joints, which will lead to leaks or, in extreme cases, deformation of the fitting.
Image 2

Missing or damaged (extruded or pinched) O-ring
A damaged O-ring can look like many different things. You look for anything that doesn't look normal. Are any pieces missing? Is it frayed? Does the O-ring look pinched or deformed? Study it closely, as the damage can be very small. Image 3 shows one obvious and one less obvious case of damage to an O-ring.
Image 3

On ORFS fittings (O-ring Face Seal), the most common type of damage is an extruded O-ring. When ORFS fittings are assembled correctly, there is metal-to-metal contact outside the O-ring groove that holds the O-ring in place. If there is a gap between the metal surfaces, excessive internal pressure will force the O-ring material out through the gap. The O-ring can also extrude if you try to bleed the system by "cracking" an O-ring sealed connection.
Extruded O-rings must be replaced, but before doing so you need to determine the cause. You can use the following as a checklist when inspecting the system to find out what is making an O-ring extrude.
Check that:
- Tubes and fittings are correctly aligned
- The pressure does not exceed 133% of the fitting's working pressure
- The O-ring has a suitable hardness
- The tightening torque is correct
Another possible cause of leakage is that the O-ring is missing or was forgotten during assembly. If the O-ring fell out during transport or during assembly, it would not have been an obvious fault. If you have an O-ring groove but no O-ring in it, you cannot create a seal. Image 4 shows an example of an illustration where the O-ring should be seated, but is missing. If you suspect that an O-ring is missing, or you are not sure whether one is missing, check with the fitting manufacturer whether one should be there.
When replacing a damaged or missing O-ring, make sure you choose the correct replacement. Just because it fits does not mean it is the right one.
Three critical factors to consider with O-rings.
- Size – never assume that the O-ring is the correct size. If it is too small or too large, the O-ring will not do its job.
- Material – you may need a specific material for your system. You don't want to use a material only to find out afterwards that it is not compatible with the system's media and/or temperature.
- Durometer (Shore / hardness) – softer O-rings are more likely to be damaged or to extrude out of the fitting. In most cases you need Shore 90 durometer
Image 4

Welding/brazing material on the sealing surface
Welding/brazing joints is a difficult art. One of the problems that comes with welding/brazing joints is that welding/brazing material can end up on the sealing surface. This problem is most frequent with leaks originating from the tube nut, as the seal is obstructed.
The welding/brazing material can flow onto the sealing surface if too much heat is applied in the wrong place as the welding/brazing ring melts. Welding/brazing material tends to flow towards high temperatures.
As soon as it is clear that the ring is melting, move the heat to the small end of the weld sleeve to encourage the welding/brazing material to flow through the joint. If you discover that the brazing material has flowed over, remove the affected weld sleeve and braze a new one in its place before assembly.
Our next blog post in our series on troubleshooting and repairing leaks will deal specifically with brazing problems.
Image 5

Damaged fitting
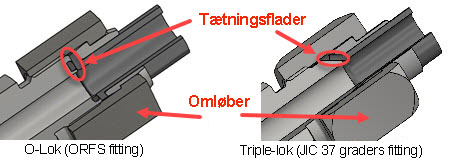
What does a damaged fitting look like? Some fitting damage is easy to spot, such as a large crack or scratch. In some cases, however, smaller damage goes unnoticed. Put on your critical glasses when inspecting the fitting, and pay particular attention to the sealing surface. Even a small scratch in the right place can prevent a seal from forming. If there is damage to the sealing surface, replace the fitting with another one. Image 6 shows where the sealing surface is and where to look closely. On ORFS fittings, the sealing surfaces are where the flanges or the tube end and the ORFS O-ring meet the face of the fitting. The 37-degree flared sealing surface is where the tube and fitting meet.
Picture 6
Once again, the damaged fitting needs to be replaced with a good-quality fitting. Fittings often pick up nicks and scratches during use or in storage if they are not properly protected. Damage to a sealing surface or to a thread cannot be undone. The best thing you can do is to inspect the fitting before assembly, so you can be sure it has not been damaged during shipping or handling. Checking the fitting over prevents future headaches with your system.
Always keep the transport caps on fittings, if they have them, until they are assembled. This prevents damage while they are stored and handled. Also, always take care when assembling fittings, as damage often occurs during assembly.
Summary
We have talked about how leaks cost a lot of time and money. Finding the root cause of the leak is not always easy and obvious, and if the wrong assumptions are made, the leak will soon reappear. With this blog post, you should now be able to identify and repair the leak while also being confident that you will not run into the same problem again.
When looking for a leak at a hydraulic tube or nut, you should consider all of the issues described in the article, because there may be more than one problem. Although taking the time to inspect fittings and ports as described in the article can be time-consuming, it is a drop in the ocean compared with the time it will take to repair repeated system leaks if the true cause is not found and properly fixed. If you are unsure about the cause of a leak, or what to do about the leak once it has been found, you are welcome to contact us. We have seen the problem before and can point you in the right direction.
Find more information about O-lok and ORFS fittings in Parker's 4100 catalogue, which can be downloaded via the link below.


